Getting started
Installation
IsoMut2py can be easily installed with pip, Python’s own package manager:
pip install isomut2py
This also installs all python dependencies, but not samtools. To install samtools on your computer, follow the instructions here.
samtools.Basic mutation detection on a set of 10 samples
Preparations, downloading an example dataset
As a first step we import IsoMut2py, which also compiles the C scripts used for mutation detection.
[1]:
import isomut2py as im2
Compiling C scripts...
Done.
Next, we download an example dataset of 10 samples from the DT40 cell line. (The BAM files in this dataset only contain reads that have been aligned to the first chromosome of the reference genome for faster mutation detection.)
The variable exampleDataDir stores the path to the directory where you wish to download the example dataset. Make sure to sets its value appropriately.
[2]:
exampleDataDir = 'isomut2py_download_dir/'
[3]:
im2.examples.download_example_data(path=exampleDataDir)
Downloading file from URL "http://genomics.hu/tools/isomut2py/isomut2py_example_dataset.tar.gz" to isomut2py_download_dir/isomut2py_example_dataset.tar.gz
File size: 2.1GiB
Downloading might take a while...
Download completed in 0 day(s), 11 hour(s), 38 min(s), 32 sec(s).
----------------------------------------
Extracting downloaded file to isomut2py_download_dir
Extracting completed in 0 day(s), 0 hour(s), 0 min(s), 59 sec(s).
And now we load the basic settings for the example dataset into a directory with:
exampleResultsDir to a path where fairly large temporary files can be stored.[4]:
exampleResultsDir='isomut2py_results_dir'
[5]:
param = im2.examples.load_example_mutdet_settings(example_data_path = exampleDataDir,
                                                  output_dir = exampleResultsDir)
Mutation detection
Mutation detection can be performed with the commands below.
[6]:
mutDet = im2.mutationcalling.MutationCaller(**param)
mutDet.run_isomut2_mutdet()
File no_ploidy_info does not exist. Using constant default ploidy of 2.
2018-12-05 10:30:57 - Mutation detection with IsoMut2


        2018-12-05 10:30:57 - Running IsoMut2 without local realignment:


                2018-12-05 10:30:57 - Preparations for parallelization:

                        2018-12-05 10:30:57 - Defining parallel blocks ...
                        2018-12-05 10:30:57 - Done

                2018-12-05 10:30:57 - (All output files will be written to isomut2py_results_dir)

                2018-12-05 10:30:57 - Generating temporary files, total number of blocks to run: 101

                2018-12-05 10:30:57 - Currently running: 1 2 3 4 5 6 7 8 9 10 11 12 13 14 15 16 17 18 19 20 21 22 23 24 25 26 27 28 29 30 31 32 33 34 35 36 37 38 39 40 41 42 43 44 45 46 47 48 49 50 51 52 53 54 55 56 57 58 59 60 61 62 63 64 65 66 67 68 69 70 71 72 73 74 75 76 77 78 79 80 81 82 83 84 85 86 87 88 89 90 91 92 93 94 95 96 97 98 99 100 101
                2018-12-05 10:33:00 - Finished this round.

                2018-12-05 10:33:00 - Finalizing output...
                2018-12-05 10:33:00 - Cleaning up temporary files...

2018-12-05 10:33:01 - IsoMut2 finished. (0 day(s), 0 hour(s), 2 min(s), 4 sec(s).)
Further optimization
The results of the mutation detection are stored in files all_SNVs.isomut2 and all_indels.isomut2 in exampleResultsDir. These are essentially raw, unfiltered results of the mutation detection pipeline that can be refined with the optimize_results() command. For this, one has to supply a list of control samples where no unique mutations are expected to be found. (These can be starting clones of a sample group from which other samples are also available or normal samples of
tumor-normal sample pairs or the same biological sample sequenced multiple times.)
In our case, file pairs (S03.bam, S05.bam) and (S08.bam, S10.bam) are two independent sequencing results of the same biological sample, thus no unique mutations should be present in any of these.
Setting these files as control samples and allowing no mutations in these samples filters other mutations as well, based on their score value:
[7]:
mutDet.optimize_results(control_samples=['S03.bam', 'S05.bam', 'S08.bam', 'S10.bam'], FPs_per_genome=0)
Interpreting the results, figure generation
Now the final set of mutations can be further investigated.
First it is generally a good idea to check the number of (unique) mutations in each investigated sample. Plotting only unique mutations allows us to check that indeed none of these were found in control samples. This can be achieved with the following command:
%matplotlib inline simply ensures that figures are visible in the jupyter notebook environment.[8]:
%matplotlib inline
[10]:
f = mutDet.plot_mutation_counts(unique_only=True)
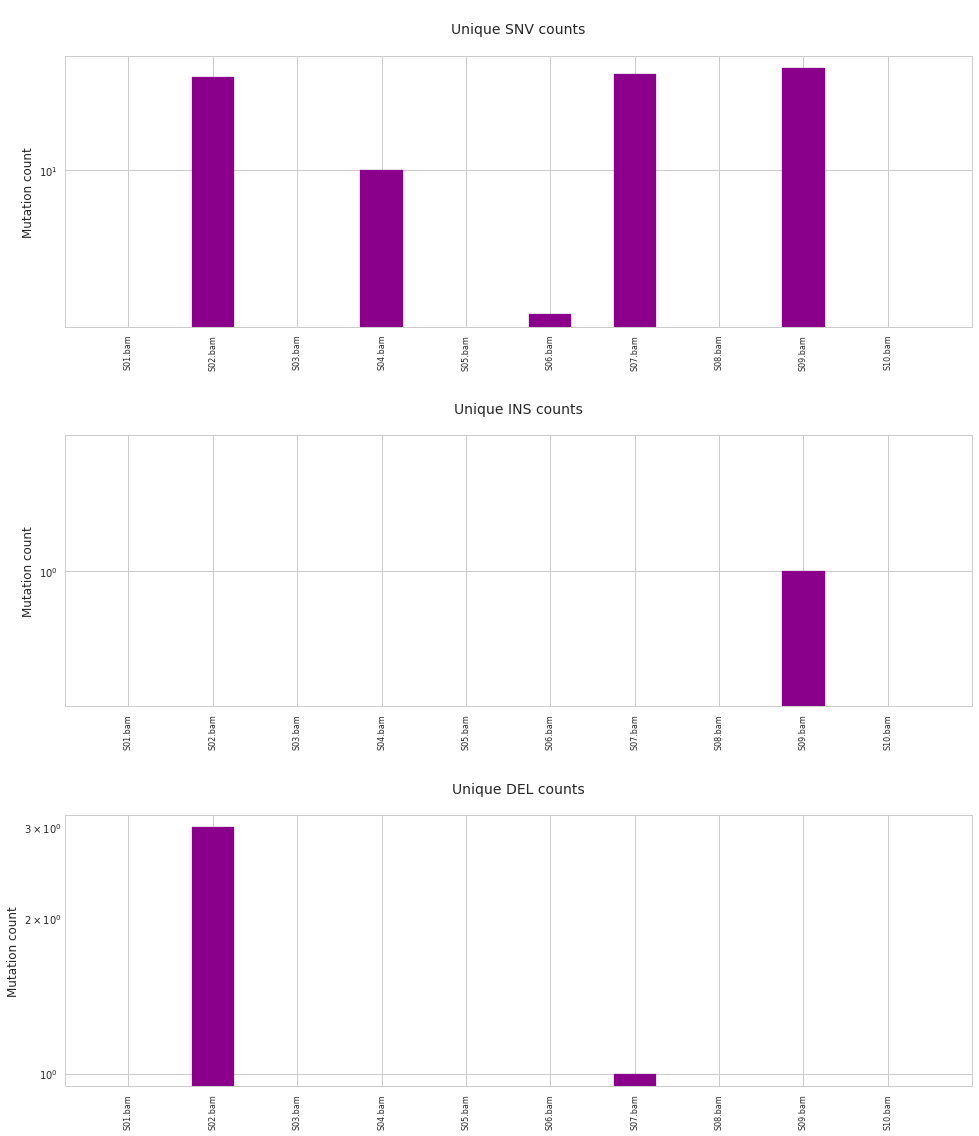
Given that the investigation was confined to the first chromosome, very meaningful conclusions should not be drawn from this example. The number of indels is extremely low, but in the case of SNVs it is apparent that control samples lack unique mutations, while other samples do not.
Further plotting options and additional tools for interpreting the results are discussed in Further analysis, visualization.
An already existing set of mutation caller results can also be analysed with isomut2py. On how to work with external files, see Importing external mutations.
On how to perform ploidy estimation and use the results for fine-tuning mutation detection, see Advanced ploidy estimation.